JR Exhibition
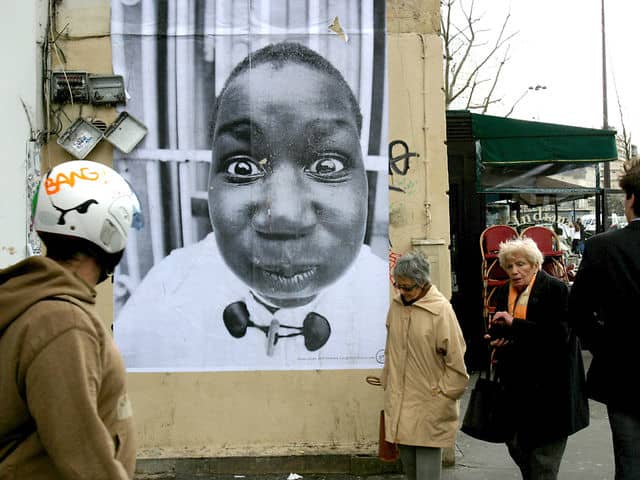
With my class, in school, we visited the Saatchi gallery. In the Saatchi Gallery we looked at JR's work. Jean René - known as JR - was born in Paris, France on the 22nd of February 1983. He first started taking photos when he was 15, with a camera he found in the tube. He would take photos of his friends graffitiing all over Paris. JR believed that using the world as a canvas, placing his work where anyone and everyone could see was very special and much better than applying to have it hung up in galleries for certain people to like and observe. JR used to take the photos of his friends graffitiing then print it out and send copies to his friends but after a while he printed out the photos and stuck them around Paris with water and glue. He used red spray-paint to create a canvas around his photographs that he stuck up to show the public that it wasn't advertising. JR successfully rolled his photographs in lots of places around Paris, including the Champs-Élysées. After a while, JR would create pieces of work about the issues going on and to represent specific people. After looking at lots of JR's pieces, we had a workshop where we made postcards talking about the world's problems and injustice. This relates to JR's work, as seen below.
In 2007 JR created a piece called 'Face 2 Face'. What he did was, he illegally pasted pictures of Palestinian and Israeli people next to each other on the walls and side of buildings. This was during the conflict between the Palestinians and the Israeli. He would get the public to guess which one of them was Israeli and which was Palestinians. Majority of the public couldn't guess. The purpose of this was to see what the division was, and seen by the results may people couldn't see it. JR portrayed them both as humans. Under everything, everyone is the same - human.
|
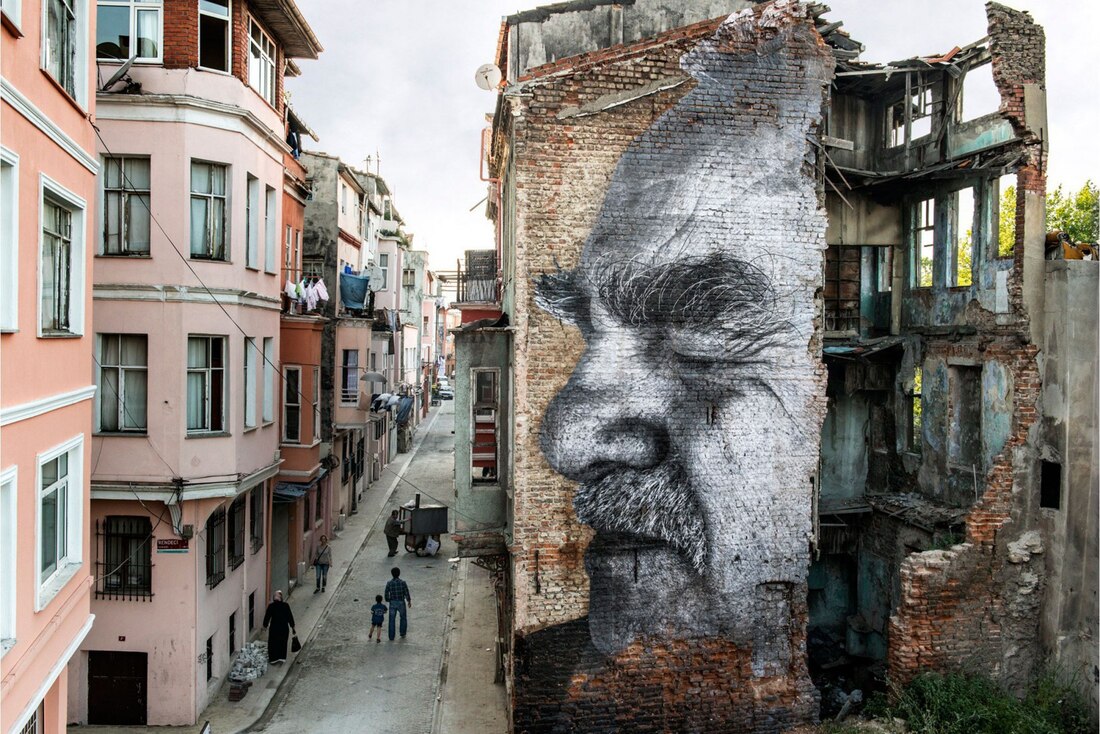
Another project that JR did that really fascinated me was 'Wrinkles of the City'. JR went to Istanbul, Shanghai, Cartagena, Los Angeles, La Habana, and Berlin. JR photographed the elderly and pasted their pictures up in the places that they wanted. He photographed the elderly to show the story of the city, and the culture. He also did this to show the beauty in aging. In 2015 JR photographed an elderly man in Istanbul. He pasted his photo on a building about to be demolished in Kadir An, Istanbul, Turkey.
|
|
|
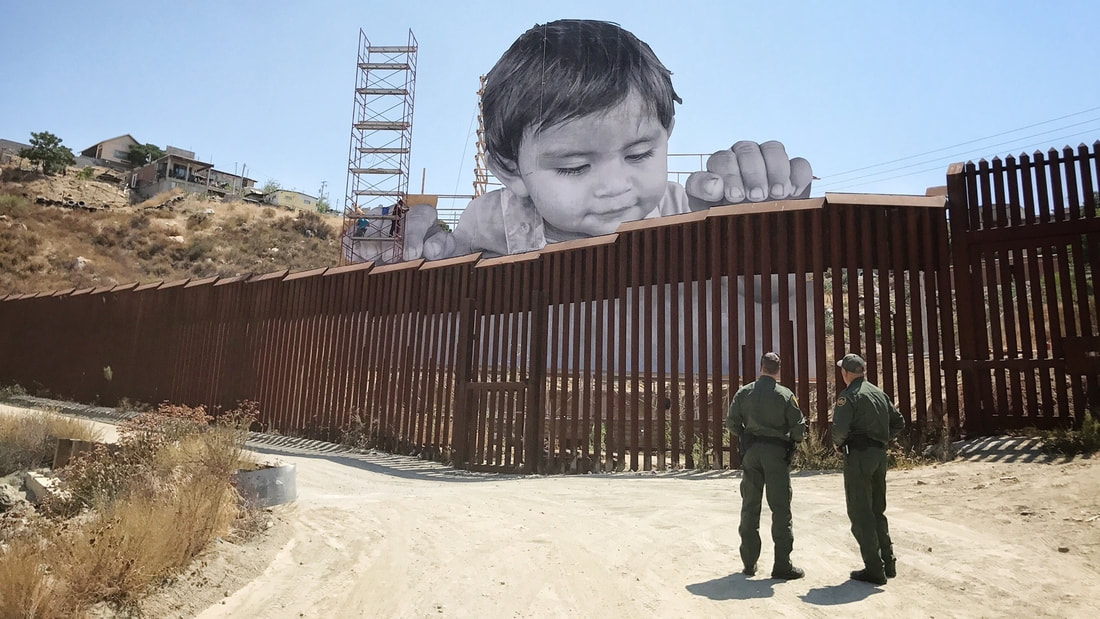
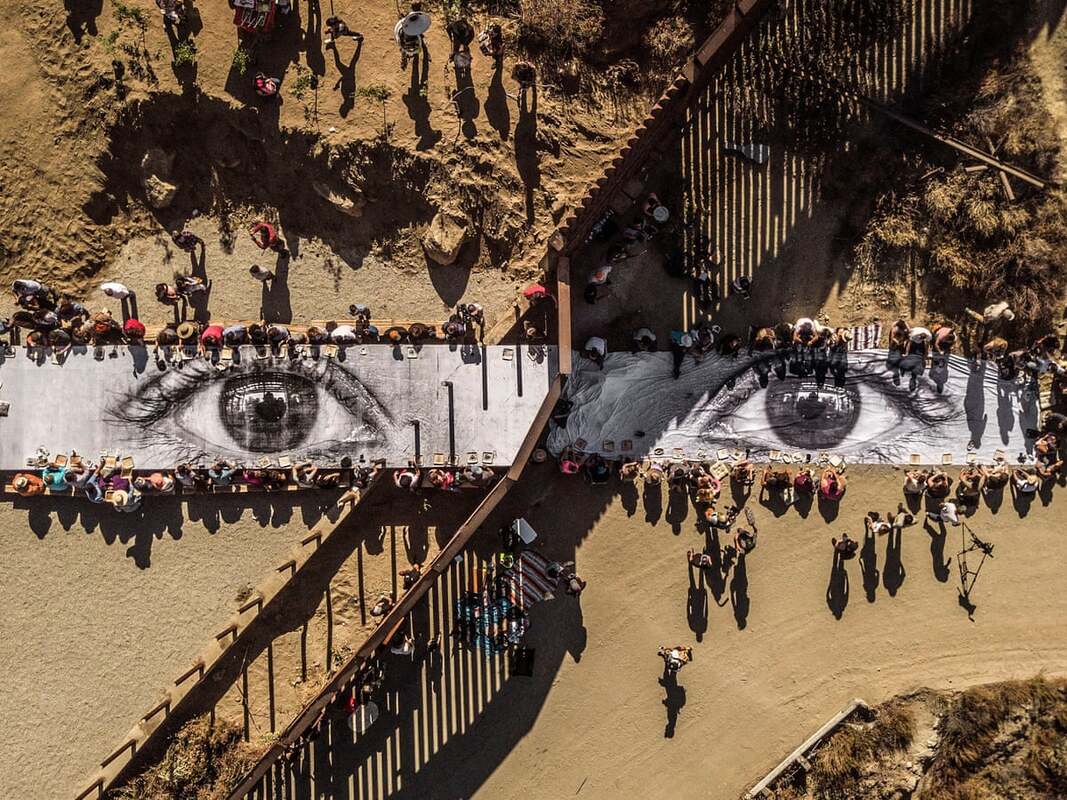
One other project that appealed to me immensely, was the ones he did on the Mexican border. He made 2 pieces on it, one called "Migrants, Mayra, Picnic across the Border, Tecate, Mexico". This was made in 2017. What JR did was he pasted one side of the cropped face - so only the eyes were visible (the face of a young undocumented immigrant called Mayra) - in the Mexican border they pasted it on a table and on the American border they just printed it on a large blanket and laid it down. They did this because they couldn't get any permission from the [ ] to do this project and so they had to lie a blanket down as that was the only way. At one point the [ ] showed up but they let them stay and finish because the [ ] happened to be an immigrant from Mexico. This story makes me happy because just like that it already shows some peace and love between America and Mexico. The other piece is called "Giant, Kikito and the Border Patrol, Tecate, Border Mexico-USA". This piece is a photograph enlarged to be nearly a 70 foot image, pasted on the border. You can see this below (the first image on the left). This piece is about the 1-year-old Kikito peering over the border in curiosity about what is on the other side. This piece represents the innocence and the peace, gathered from the vulnerable, playful toddler peering over, of the Mexicans. This was made to show everyone that when they look at Mexicans they see them differently from the way that they are portrayed in the media - they see them like that 1-year-old boy.
|
Portraits of a Generation
JR
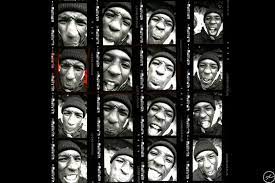
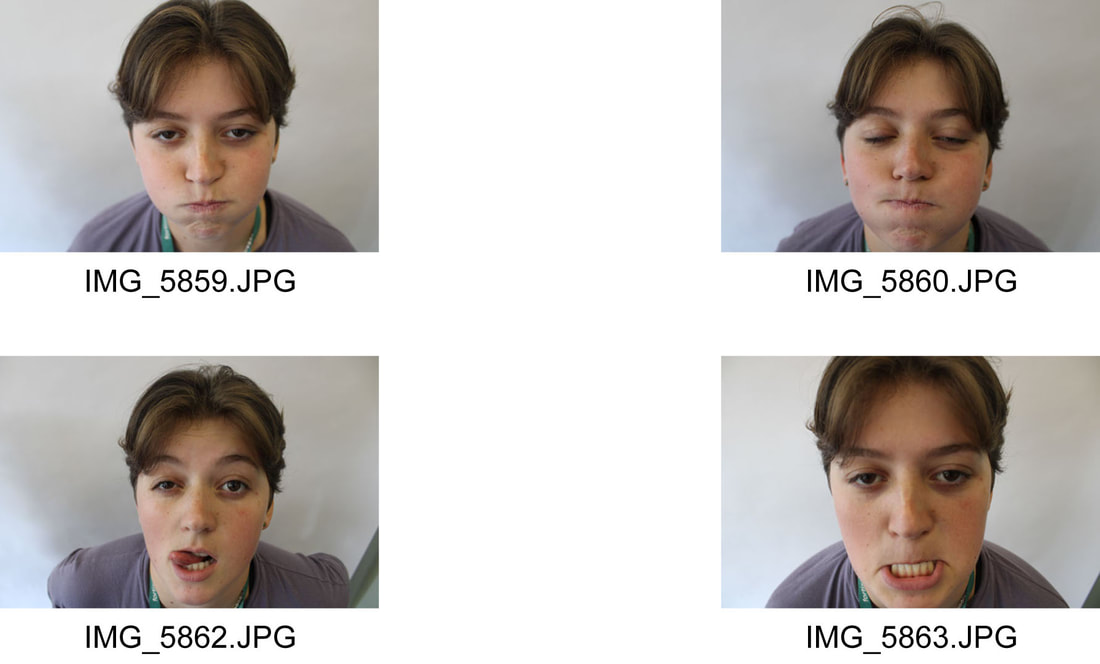
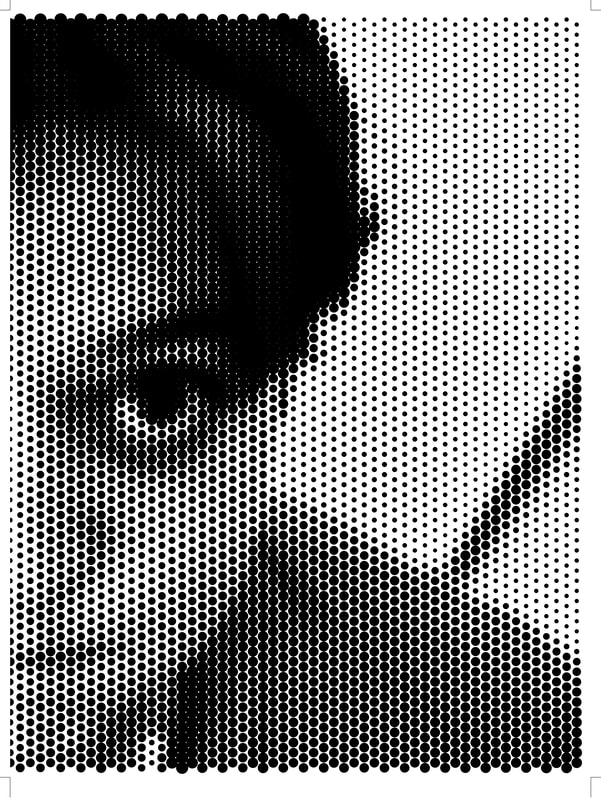
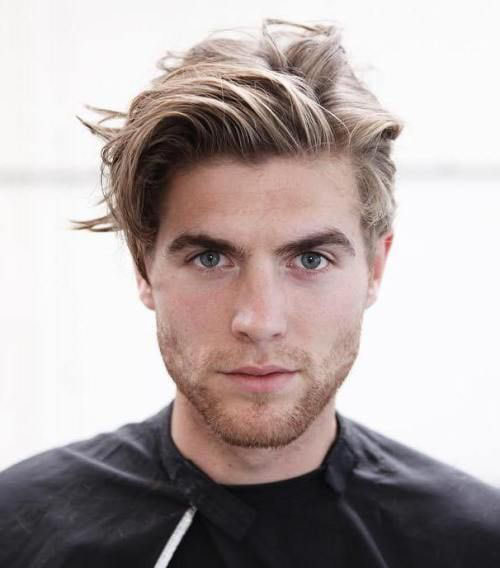
Portrait of a generation is one of JR's projects. He photographs his friends and people of the public in compelling compositions making unique facial expressions.

|
|
|
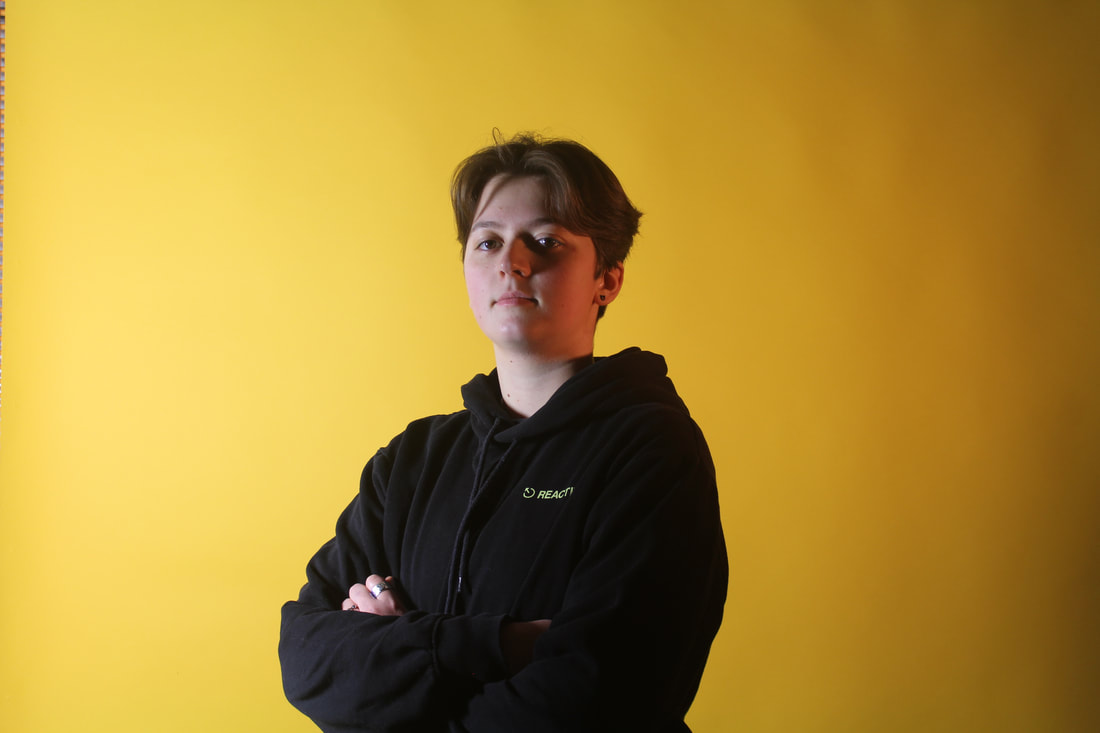
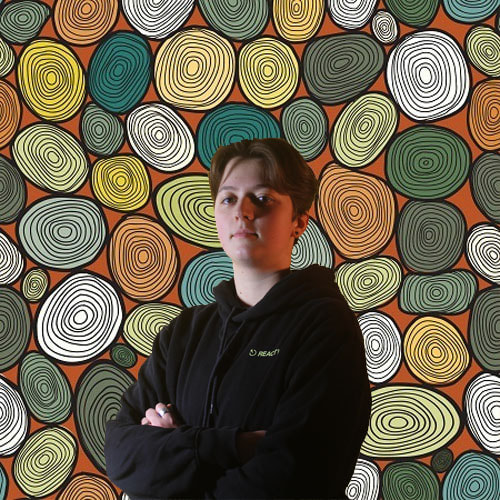
My response
|
|
|
|
|
WWW:
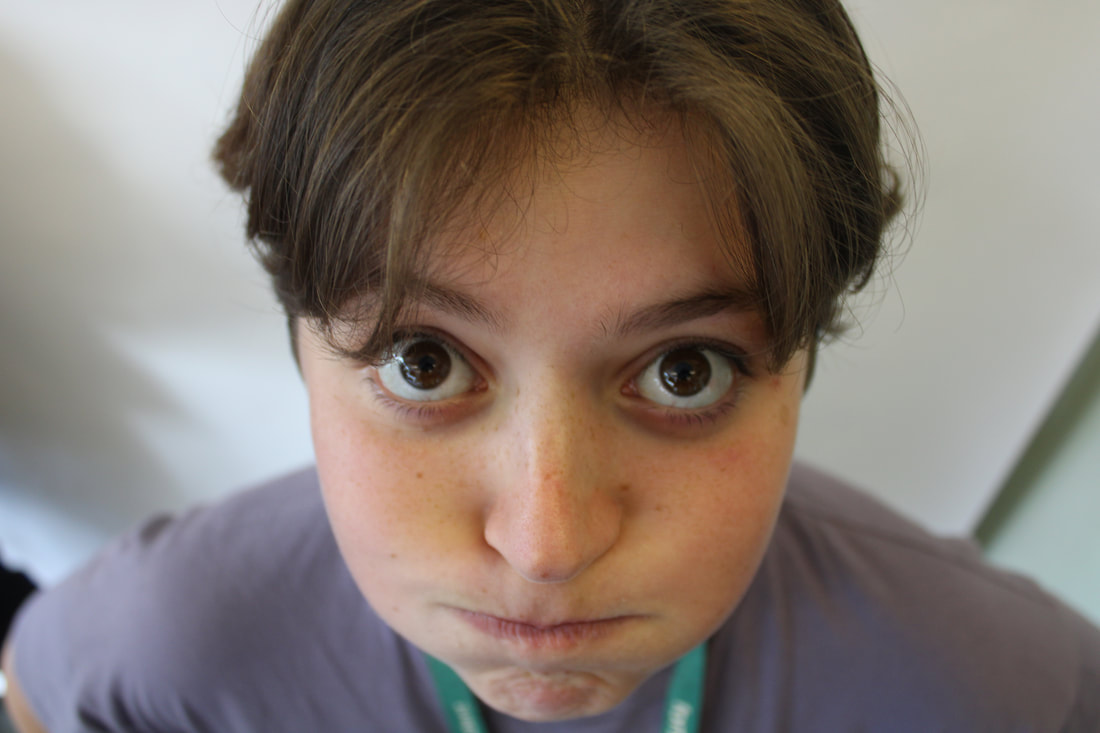
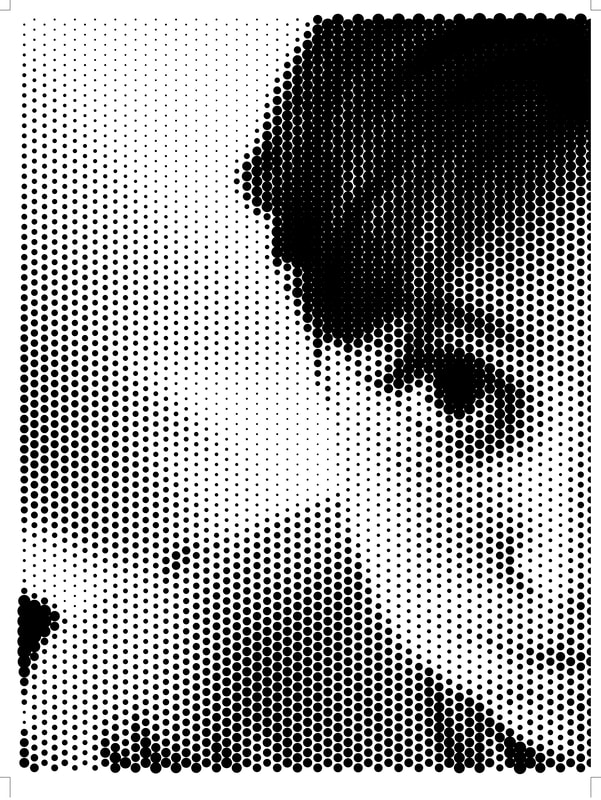
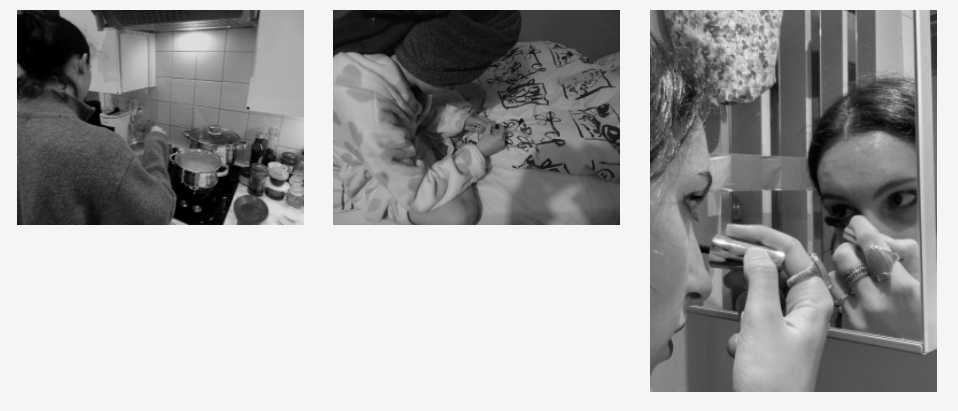
My composition of my subjects face is good as it creates the distinctive images of the face. I have a good lighting which makes the same image in black and white still show parts of the face. |
EBI:
I have photographed the image around my home environment, so that it resembles JR's work more. |
Geometric Faces
Digital
Gordin Magnin
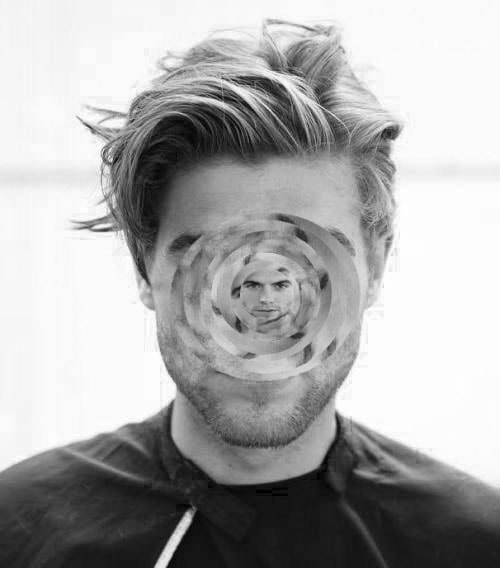
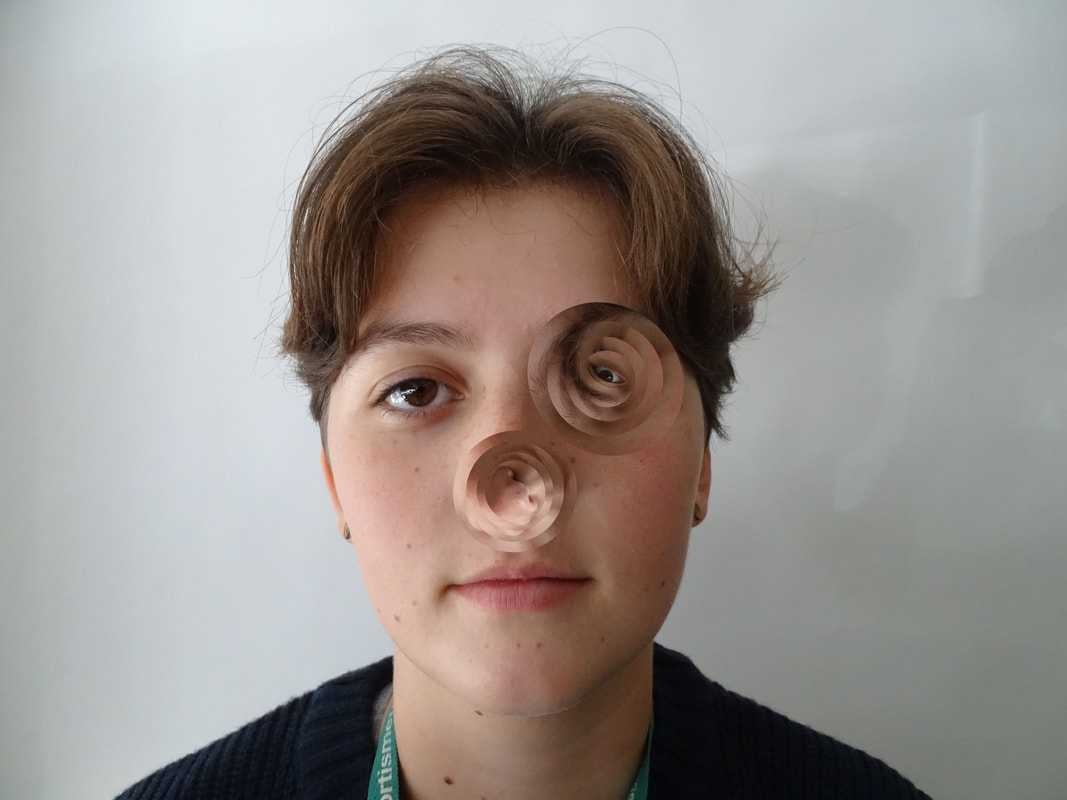
Gordon Magnin is an artist that works in photography, scans, collage, and photoshop - altering images. He has a masters in architecture and a bachelor of science in structural engineering. He then complete studies in Mountain school of Arts, in 2008. He photographs peoples faces and then edits them by changing different structures in their faces with different shapes on a photo editing website.
|
|

|
Practice
|
|
|
WWW:
The circular edits make the photo have a more blended edit creating a sense of some supernatural mold of the face, unlike if I had done this with a triangular tool. |
EBI:
I edited seperate parts of the face and not just the whole face. Furthermore, if I had made 2 or 3 more circles then the face wouldn't of been so visible as a small circle (seen in my edited photo) and the image would of had more of the molded face effect. |
First Response

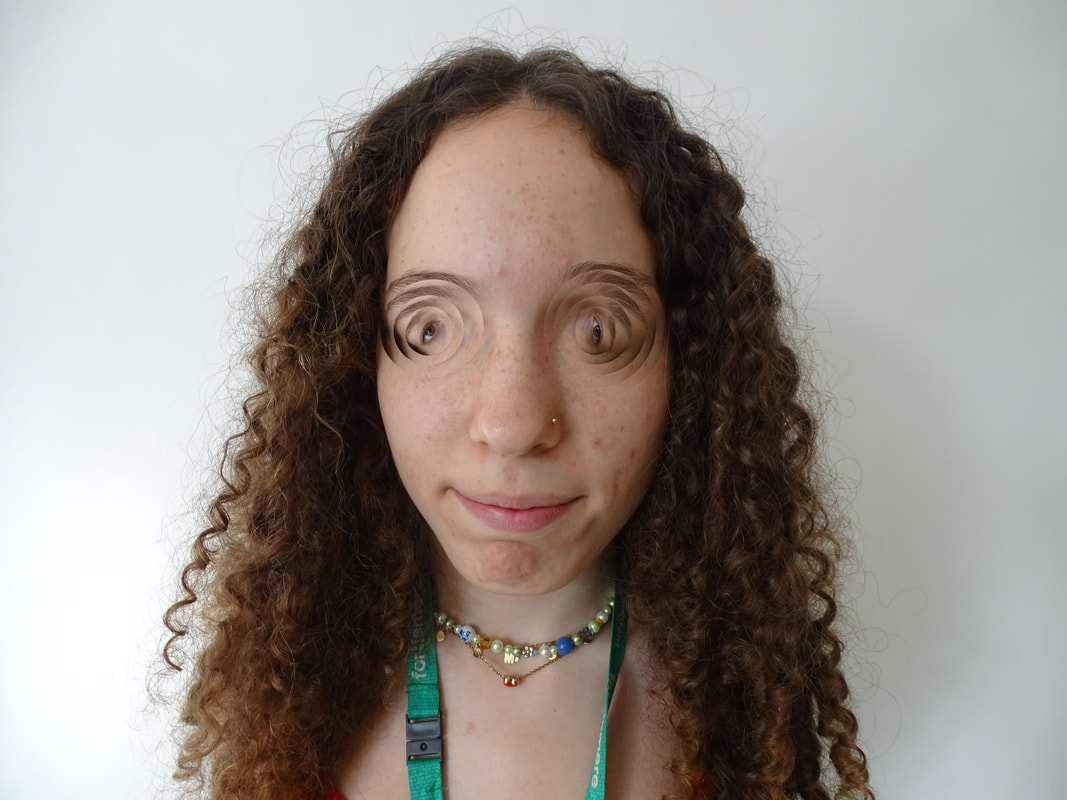
I like this GIF because it has lines of symmetry which create a sense of alignment and contrasts with the unnatural human face of 6 eyes and 2 mouths.
|

|
How to do:
|
|
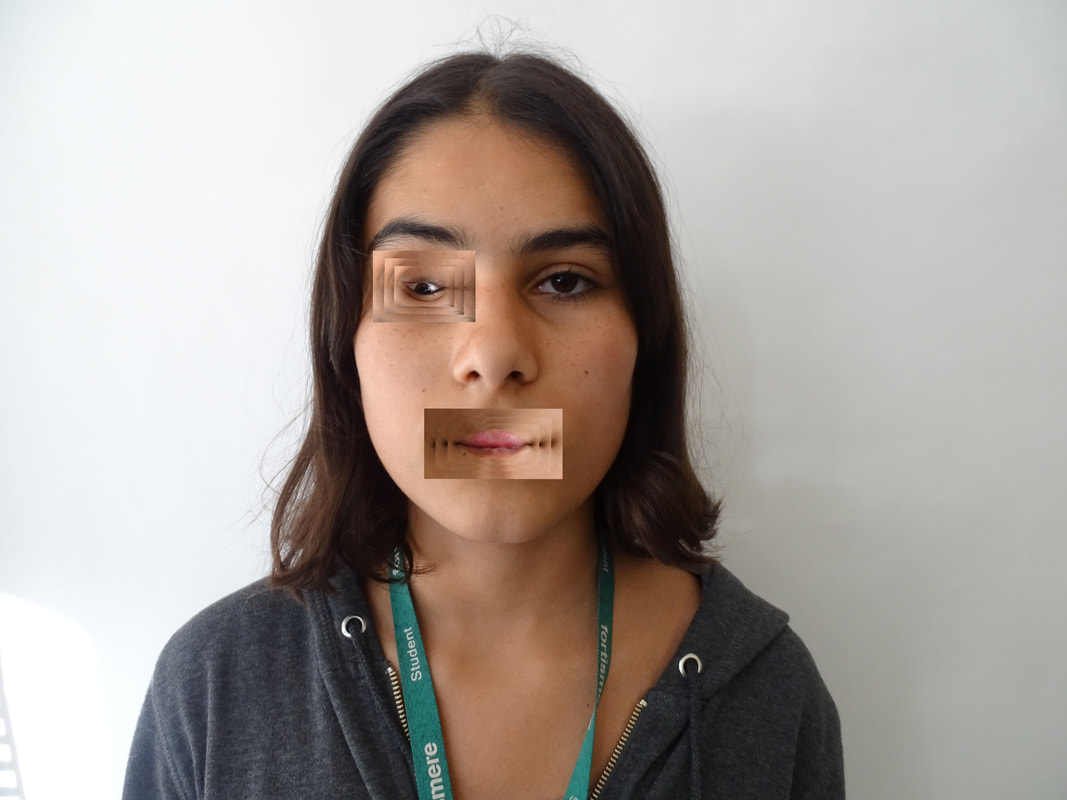
First, drag your image into photoshop. Then, you create a layer of the same image and press the 'rectangular Marquee tool'. After that, you decide which part of your image you would want to edit and draw a shape around it. After that twist and move the selected part where you prefer. Repeat the step as many times as wanted. Once done, save your image - depending on where you will upload the image save as JPEG. Then you have your image!
|
|
WWW:
I edited the faces of my images successfully in photoshop. They turned out interesting and I made a GIF of one of them. I used my EBI in the practice response which enhanced my edited images to be more compelling in this response. I like the first image out of the 3 images that I have digitally edited the best because of the hypnotic look that they eyes portray. |
EBI:
I had edited the faces in a more peculiar way that would captivate the viewers more. For example, I could have cut unique geometric shapes out of the image and move it to certain parts of the face that made my image seem as if that part of the body was getting pulled away from its original position. |
Physical
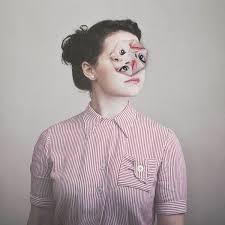
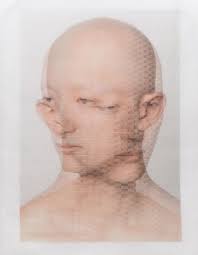
Alma Haser
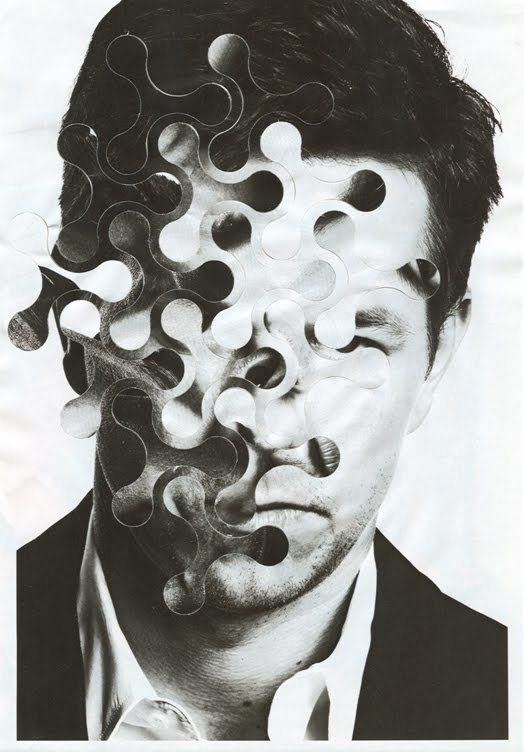
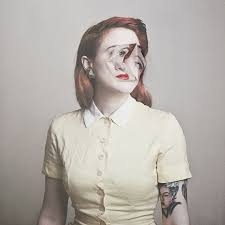
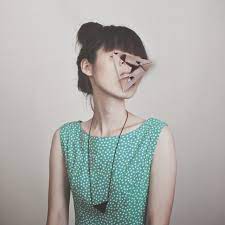
Alma Hater creates unique and artistic work. We are looking at her collection called 'Cosmic Surgery'. What she does it, she takes portraits of people then she makes two copies of it. Then using the process of origami she fold the second sheet of paper into an interesting geometric shape. She then sticks the shape onto the first picture in a specific location. I really enjoy her work because its really captivating. She is one of the few artists that we have looked at that have different work to others. The effect pf the 3D on the 2D really makes it interesting and unique.
|
|
|
I did this but I deleted my response to it by mistake.
My response
|
WWW:
Using the template of the pentagon, I made an good pentagon from the image of the girl and placed it in captivating places connecting parts of the body from the pentagon to the flat sheet. |
EBI:
I had made my pentagon neater, with all the sides connected - some not because hey were either too log or too short. |
Weaving
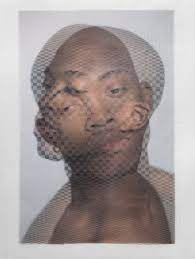
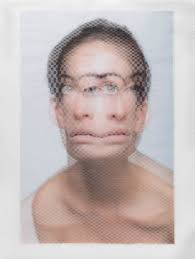
David Samuels Stern
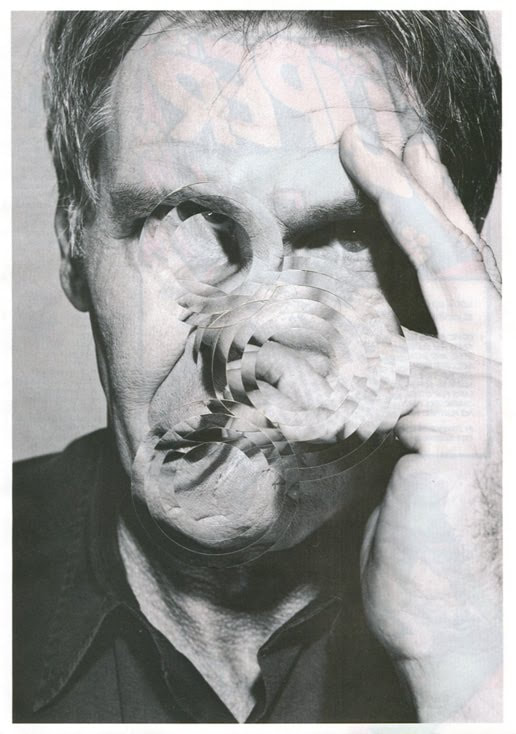
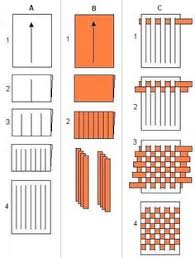
David Samuel Sterns is an American artist and photographer born in Brooklyn, 1982. As a child, Stern photographed lots of things and drew. The work that we are responding to is his weaving project, where he takes photos of people and he prints out two copies. He then cuts one into horizontal strips and the other to vertical strips, after weaving the strips together. He chose to do this because he finds it interesting 'and [he] thinks everyone has an innate interest in pattern and rhythm,' and simply because 'at the end of the day I really want to be crafting objects.'. He explains in an interview how 'Weaving and pattern are a kind of mechanical indifference, and combining this with the longing of portraiture, I find beautiful. I wanted to embrace this conflict to make images that are, underneath it all, depictions of a person.'.
|
|
|
My response

How to do:
|
You will need:
- two pieces of paper with the same image printed on - scissors - ruler - pencil Firstly, you measure 1c (or whatever you decide) vertical strips on one of the pieces of paper and 1cm horizontal strips on the other sheet of paper. |
|
|
WWW:
I managed to create my weave, and because I cut in in 1cm strips it made my weave look more interesting. My weave portrayed me as if I had 4 eyes, so it doubled all my features. |
EBI:
I had made my weave a bit straighter and if I had made it interactable, by not sticking the strips of the second sheet to the strips from my first sheet so they can move and create a different style to my face. |
Creating a response to Stern's weaving project really interested me because it was different to the other projects of artists that we usually look at. Implementing the practical work took time but was very fun, plus it created this almost magical piece. The weaving created 2 copies of the face fabricating an effect of movement in a stationary, flat object.
Kehinde Wiley
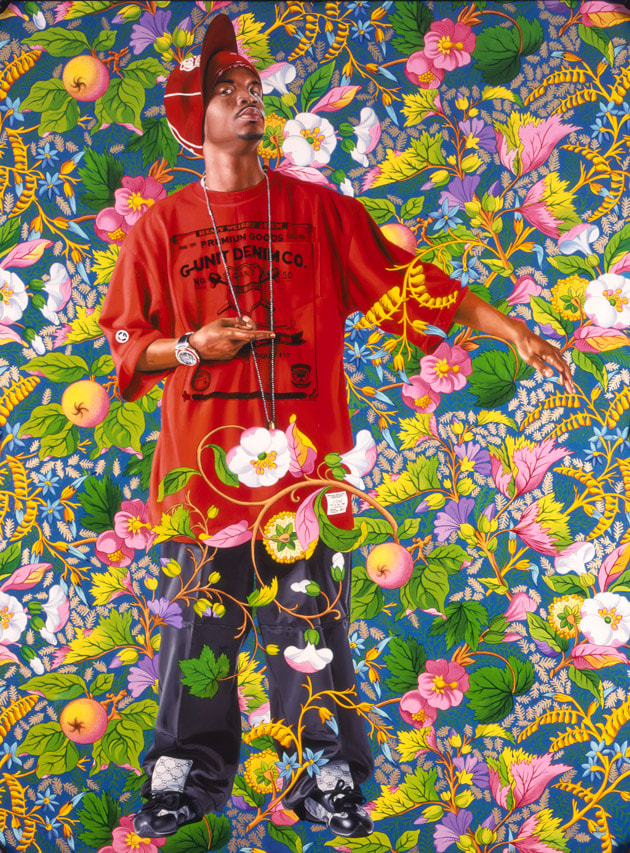
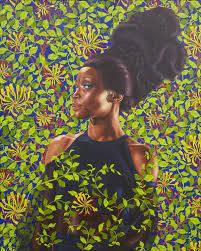
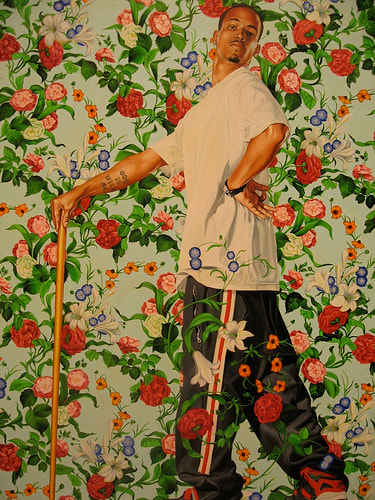
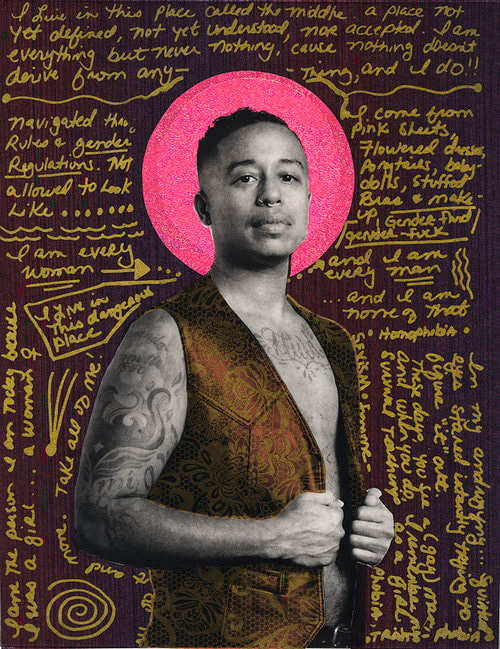
Kehinde Wiley is an American artist best known for his portraits that feature African-Americans, painting in a photorealistic style. He has his own take on the traditional paintings by recreating the actions that they are doing in the portraits but modernizing the clothes and background. Wiley creates these portraits to critique art historical norms - the way that it is mostly seen that white people are painted. Wiley incorporates these beautiful designs to the backgrounds of all of his portraits. Wiley’s paintings “quote historical sources and position young black men within the field of power.” His heroic paintings evoke a modern style instilling a unique and contemporary manner, awakening complex issues that many would prefer remain mute.
|
|
|

|

|
How to do:
|
|
First you upload your two images that you will use onto photoshop. Then, using the "mouse" tool, you press on the image of the person then drag it into the background design. After that, using the "quick selection" tool, you select sections of your image that you want to be cleared, then press edit and clear. Do this for the rest of your image. Once you have done that you can see the is the outline of the person has not gotten cleared, so pressing the rubber tool you carefully rub out them out following the outline of the person - easier to do if you zoom in. Hereafter, to make your image blend in more with your background design, you can make the image of your person less opaque (on the right bar of photoshop) so that you can see the design and make parts overlap on the person making the image look beautiful. Then you reset the opacity to 100% and save it!
|
|
WWW:
I have recreated the renaissance painting as well-thought modernized photo. I potoshoped the background patter image and the image of my subject well. |
EBI:
I took multiple photos and if I had made some of the leaves overlap parts of Selin so that it had the affect that Selin was in between the leaves. |
Kehinde Wiley's work was one of my favourite pieces to respond to because of the beautiful messages that his work conveyed and the messages that mine could. The beauty in the background designs were extremely captivating and simply elegant.
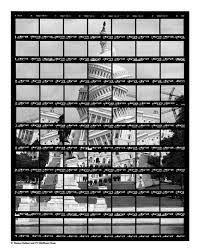
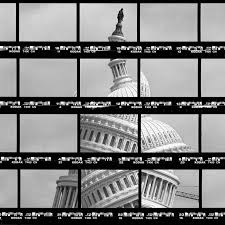
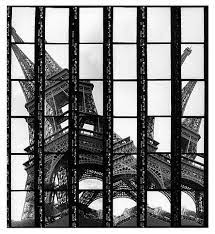
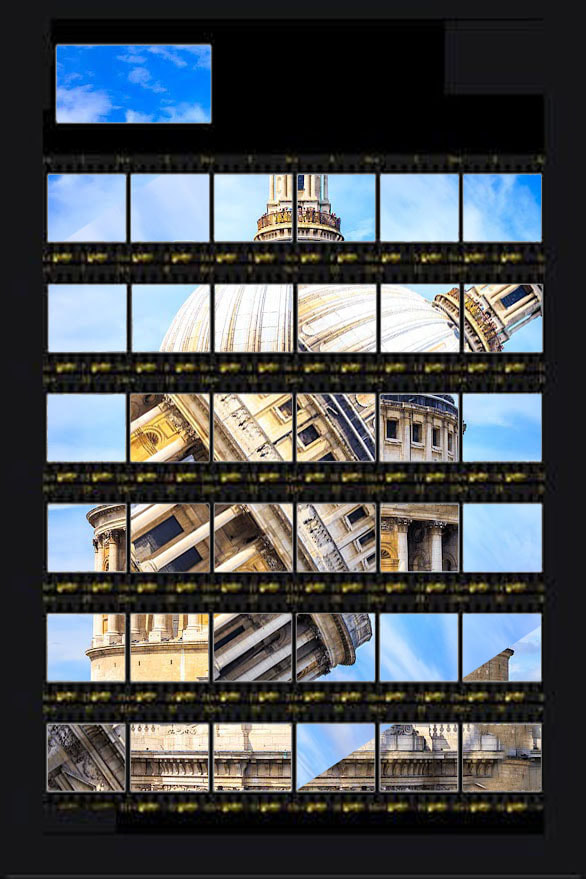
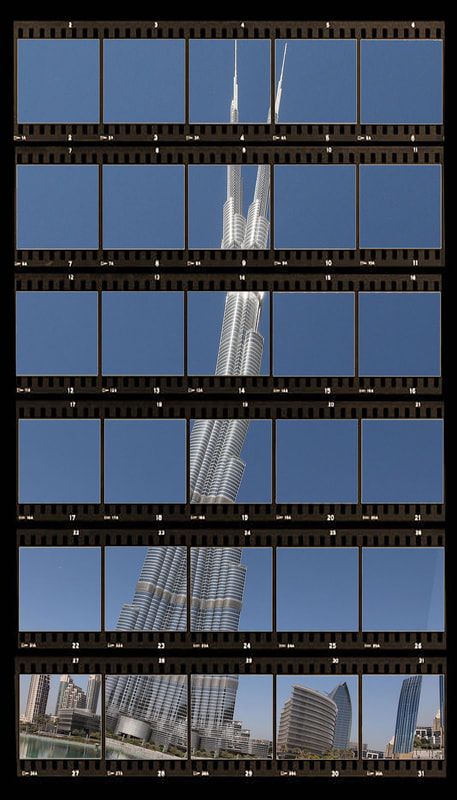
Thomas Kellner
Thomas Kellner is a fine-art photographer. His work begins from Cubism and is incorporated with deconstructivism in architecture to photography. Kellner's work is created to show different angles and view points. He photographs buildings and using contact sheets he prints multiple images of the building and creates the an artwork of the building in captivating angles.
|
|
|
First response
|
|

|
|
WWW:
My response was kept interesting in the way that there were stair cases built round and round the building and the building wasn't directly upright, it was as though it was "defying" gravity. |
EBI:
I had erased the bottom of the image so that it doesn't look like there are 2 images overlapped, and that it creates the full effect that the building is in fact real and that it is standing. |
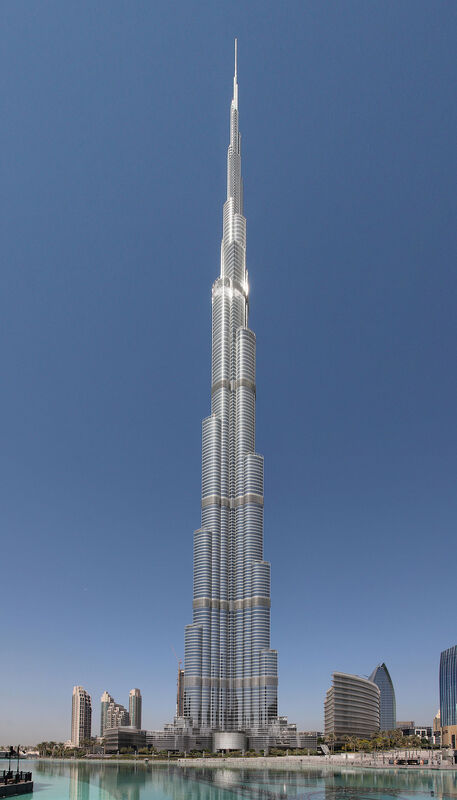
Second response
|
|

|
|
WWW:
I have made the bottom landscape of the photograph look better than in my first response. I liked my idea of making two spikes on the Burj Khalifa because it strayed away from the original design and made the building look abstract. |
EBI:
I can improve my final response by editing the Burj Khalifa into a much further engrossing design. For example, I could edit the body of the building to be as if it is curved side to side. |
I liked responding to Thomas Kellner because you can take an already thought out architectural design and further mold it to your own imagination.
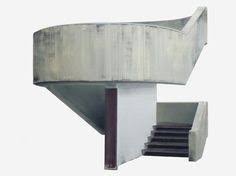
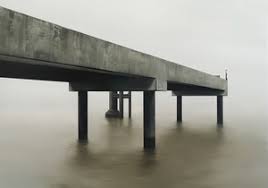
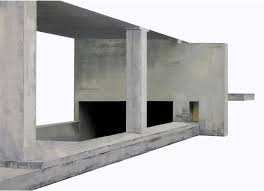
Patrick Cornillet
Cornillet creates work of detailed realism. He photographs 'austere constructions in empty environments. Places in a non-space, fragments of enigmatic architecture.'. His work show the material's strength and how it outlives the human-life. He focuses on the light creating shadows where wanted and light highlighting certain areas, creating depth. Cornillet photographs in a specific composition enhancing diagonal and straight lines to make the image compelling.
|
|
|
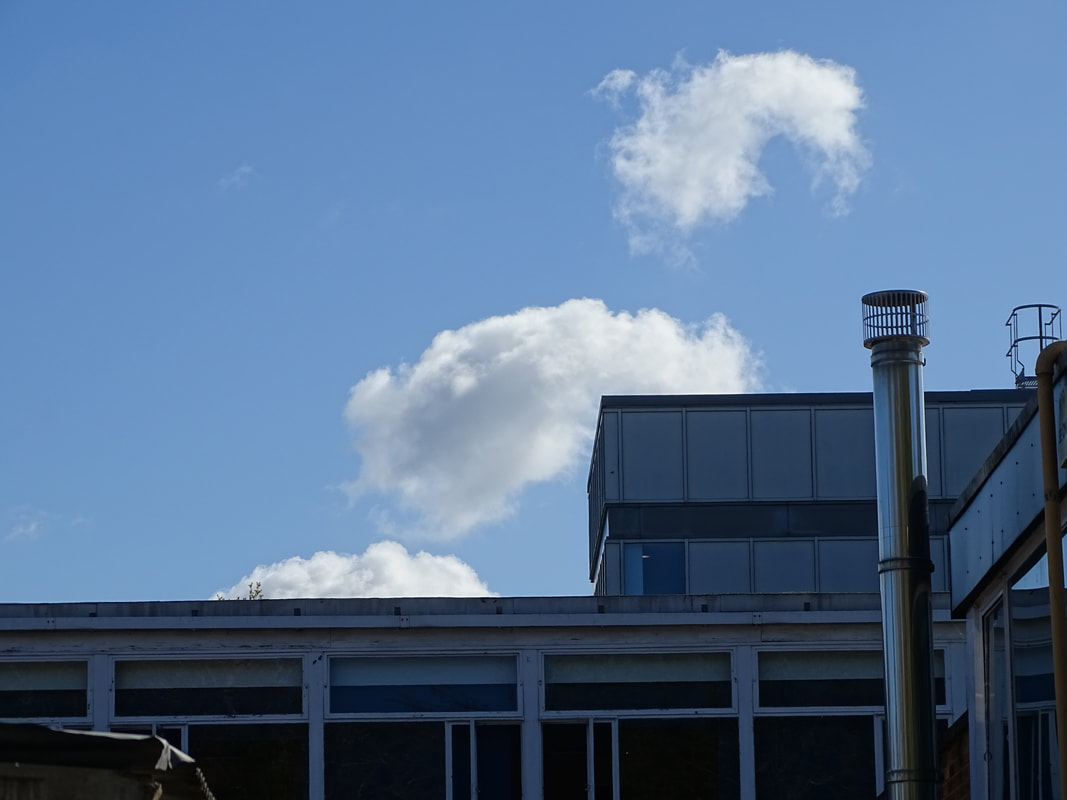
First response
|
|
How to do:
Open the image you want to edit into photoshop, and an image of just white. Next, get the "polygonal lasso tool" and draw around the building. Then press the "mouse tool" and then select the building and drag it onto the white background. Then fit to size and edit it to smooth pout some surfaces by pressing "filter" then hover over "blur" then press "average". After that, save as JPEG, and you are finished!
|
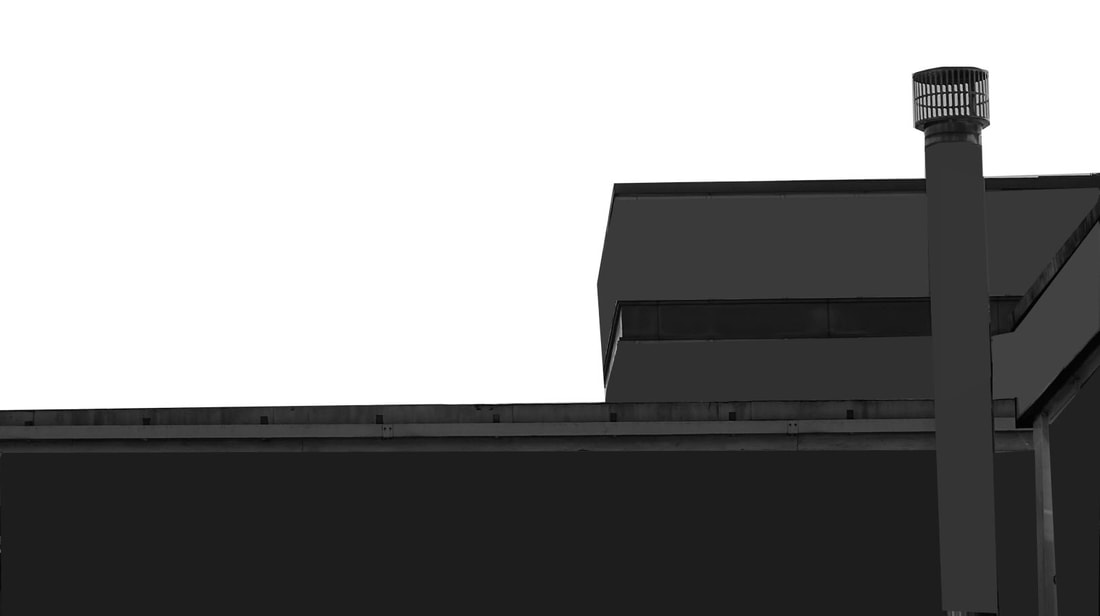
WWW:
My finished image looks nice and neat because I cut the building out the image neatly with straight lines. My edited image look brutalist because I blurred parts of the mbuilding to make the same colour and have a smooth texture like concrete. |
EBI:
If I made another response, and if I took it a step further by adding colours. |
Strand 1
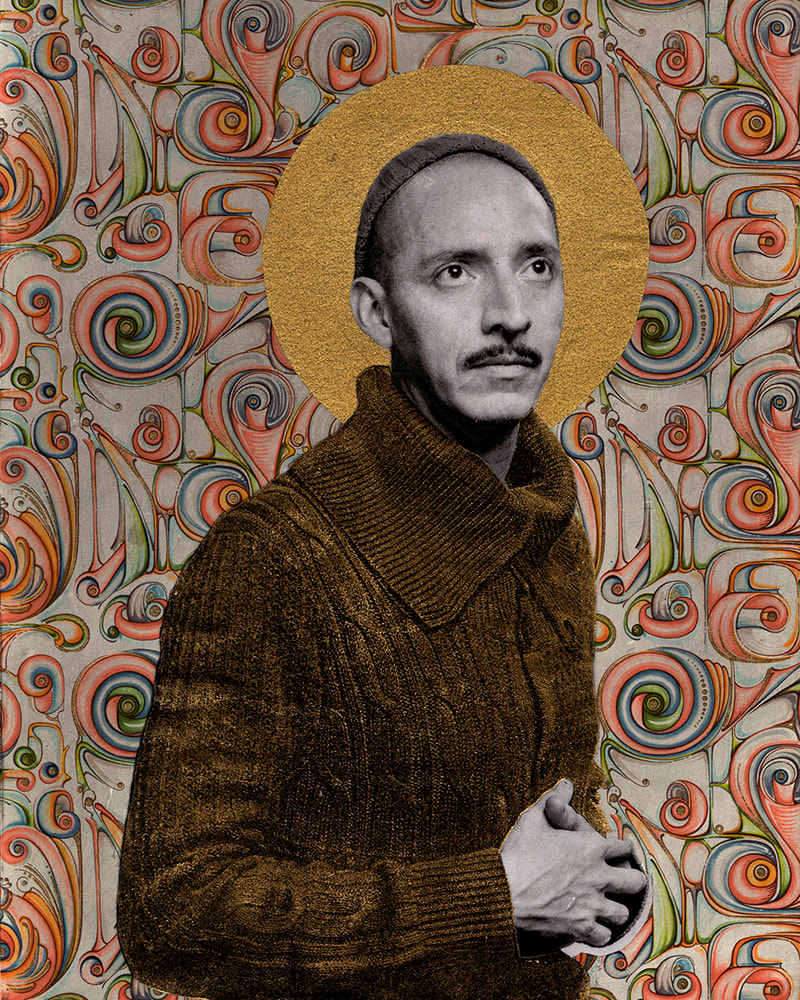
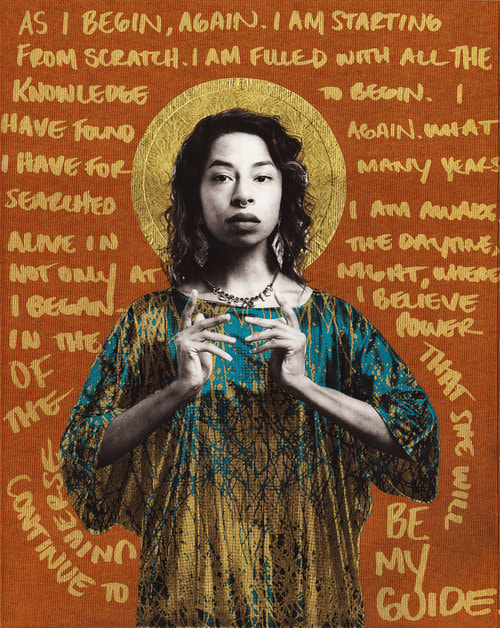
Gabriel Garcia Roman
Gabriel Garcia Roman received his Bachelor of Arts degree from The City College in New York. He is a multi-displinary artist and craftsman who examines and decodes the politics of identity through intricate and process based work. He is very successful with many of his work up in galleries; Museum of Latin Art, Galeria de la Raza, Cathedral of St John the Divine, the Centre for Photography at Woodstock, BRIC.
|
|
|
First response
In my first response I will photoshop a background (chosen by my subject) to the photo of my subject. This is linked to Gabriel Garcia Roman.
|
|
How to do:
|
|
First, drag the two images that you will use, onto photoshop. Then, using the "mouse" tool press on the image of your subject and drag it onto the image of the background. If needed, press "command" "t" to position the image of your subject how you want it. Next, (while having "layer 1" selected) using the "rubber" tool rub out the outside of the subject, zooming in to rub out the finer detail. Once that is done, press "file", "save as" and your done, remember to save the image as a JPEG.
|
|
WWW:
My image is clear and the stance of my subject conveys power and pride. This is successful because Roman creates these pieces to present pride in everyone. The background design is delightful and effervescent. |
EBI:
I photoshopped a patterned circle in the background behind the head. This would resemble the artists work and highlights the subjects. |
Second response

|

|
|
WWW:
I photoshopped Lily well onto the background. I incorporated what could be improved in my first response to this response - the circle round the head, highlighting my subject. |
EBI:
I had made a GIF that changes the background and clothing of my subject. This makes it interesting and different. |
Third response
|
|
How to do:
|
|
Once you create your individual images, upload them all onto the website called gifmaker.me. After that you can adjust the canvas size (so the size of the image) and the animation speed (the speed at which each image is viewed for). Then you press create GIF animation to create your GIF, then press download the GIF, to have it downloaded onto your device, ready to upload wherever you want.
|
|
WWW:
I completed my GIF successfully, with the background and the circle above the head changing in design. I used contrasting colours to highlight the subject and draw in the attention of the viewers. |
EBI:
|
Strand 2
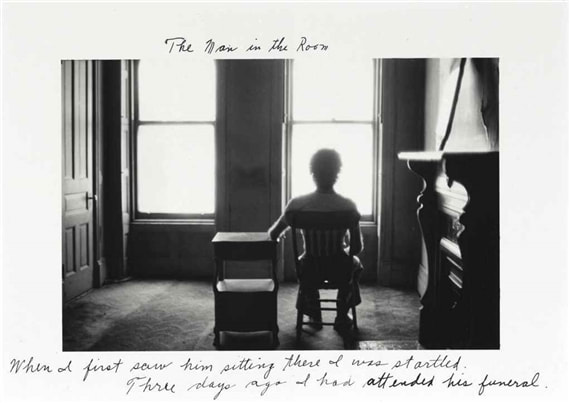
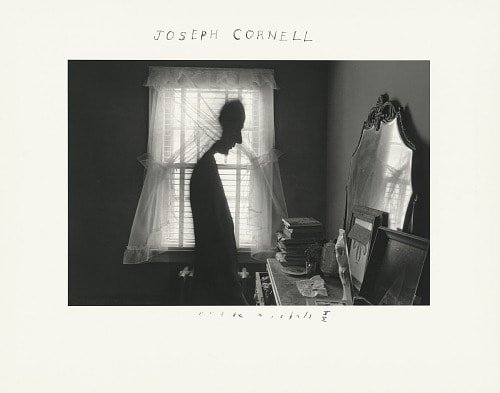
Duane Michals
Duane Michals is well-known for his series of long exposure photographs, all telling a story. He is considered on of of the great photographic innovators of the last century. Michals received a BA from the University of Denver in 1953.
First response
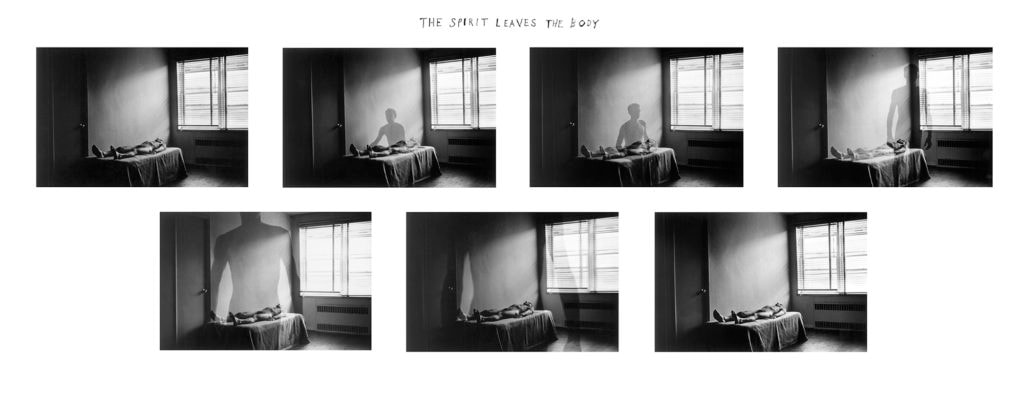
For my first response, I intend to take a series called 'The soul leaves her body', based from Duane Michael 'The Spirit Leave the Boy'. I plan to include my own element to this series that differs from Duane Michel's, I will have a long shutter speed setting symbolising the struggle between the soul and the subject, with the end photo being her left lying - lifeless.

|

|

|

|

|

|
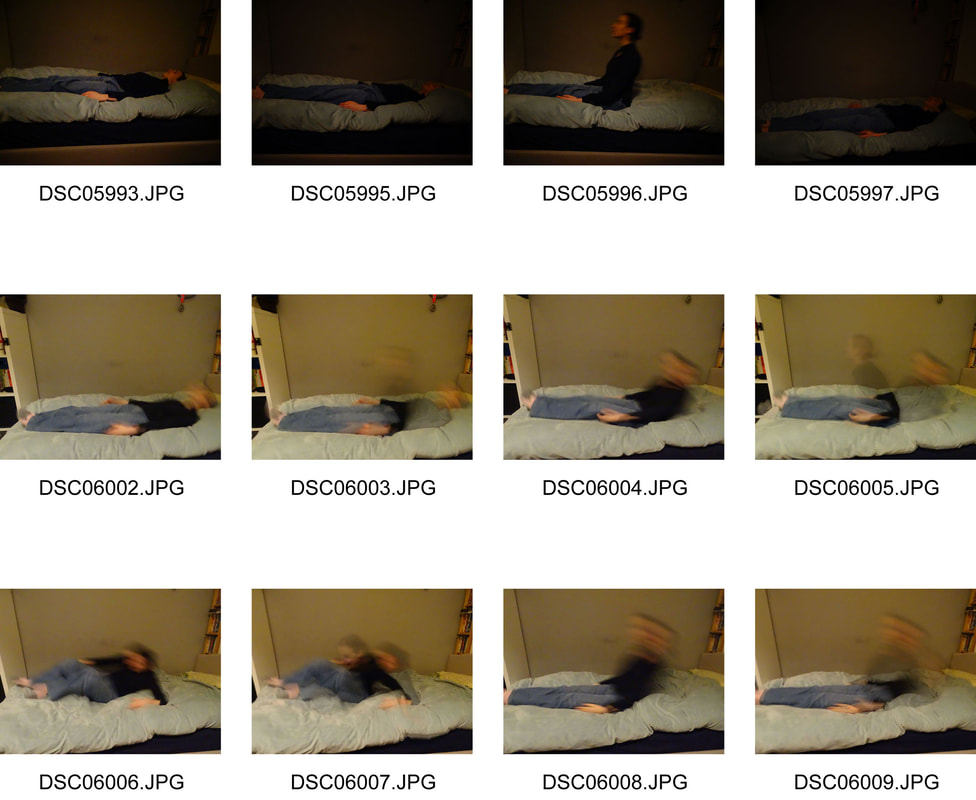
The Soul Leaves her Body
|
WWW:
I really liked the concept of my piece, the soul leaving her body. It shows creativity and is portrayed well with my long aperture setting. |
EBI:
My subject as based in an empty room allowing me to capture the whole room evoking the element of vulnerability and alone. |
Second response
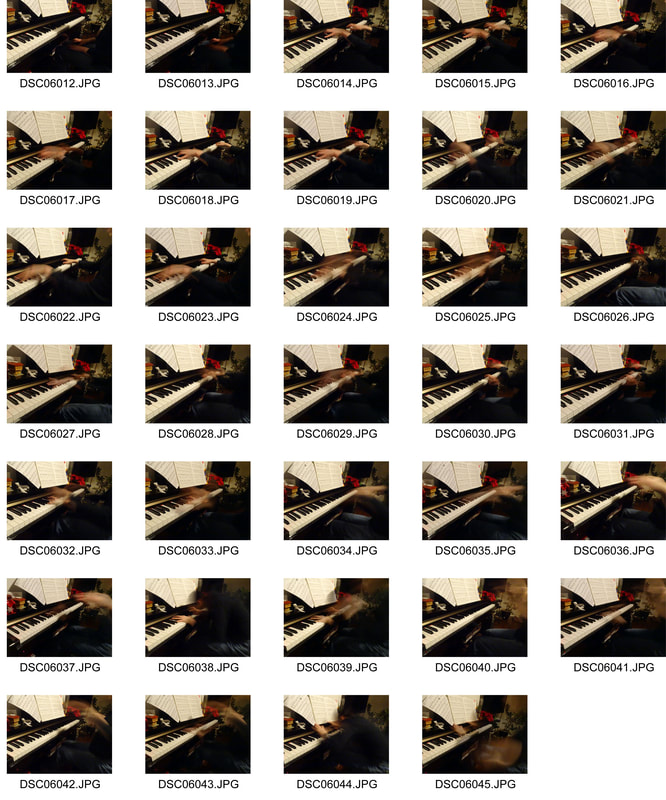
My second response will be named 'The Piano Came to Life'. I will be a series of images where my subject plays the piano and slowly her hands get sucked in, following, her whole body. This links to the chosen artist because it is a series telling a story. I have also encorporated my own element into this response too by having a long shutter speed setting.
Strand 2

|

|

|

|

|

|

|

|
The Piano Came to Life
|
WWW:
The angle of my shot is positioned well showing the piano "sucking" in my subject. I used a long shutter speed which helped create that affect, by adding a blur to my subject. |
EBI:
I had a finishing shot that is just the piano, to show that the piano sucked her in and she is kept there. |
Third response
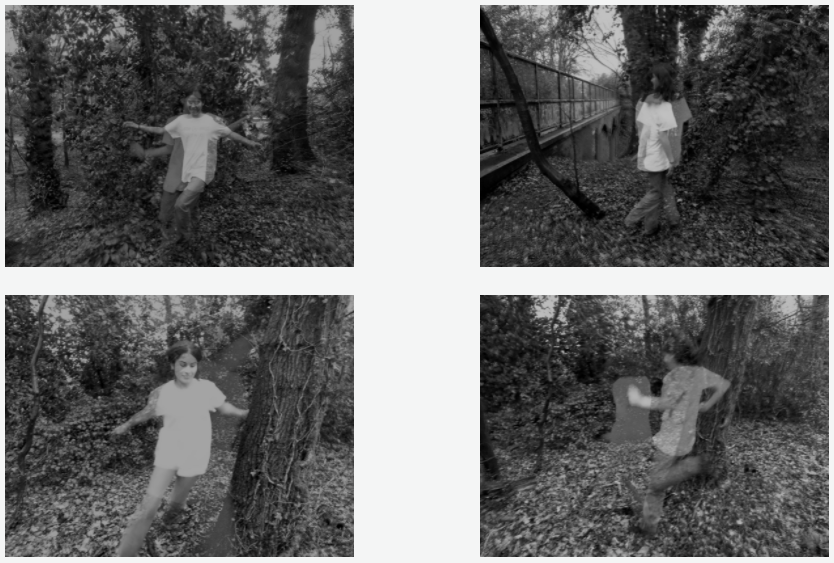
The third response is named 'the effects of the woods' symbolising the joy and freedom that nature brings.


|


|
|
WWW:
The black and white of the images create a sense of mystique and memory. The aperture was on a good setting - slow aperture - creating the blur and "double" of my subject. The setting in the woods and the slight blur of the outside of the photograph adds to the slight sublime romantic connotations. The subjects facial expressions convey the emotion to the audience. |
EBI:
I had photographed my subject in other setting as well, creating a broader range of photographs with different connotations. |
I enjoyed responding to Duane Michals, as the idea of objectivity (the style that Michals works with), and the black and white images with long exposer that have meaning and character. Furthermore, the addition of my own element into my response really appealed to me. Instead of creating clear images with another image planted on with a lower opacity, I created the images with blur - as a result of a long shutter speed. I prefer that because it shows struggle and pain, which is further conveyed to the viewer through the black and white.
Strand 3
Cindy Sherman
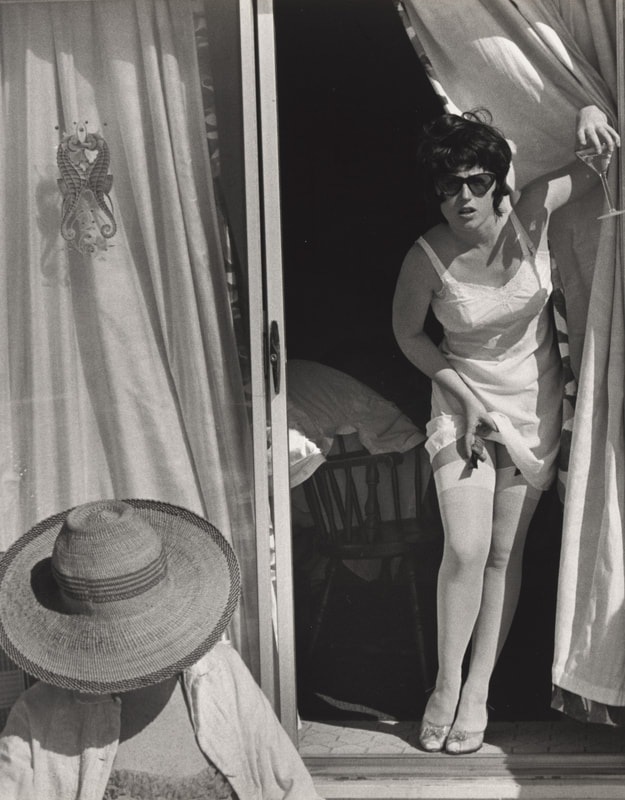
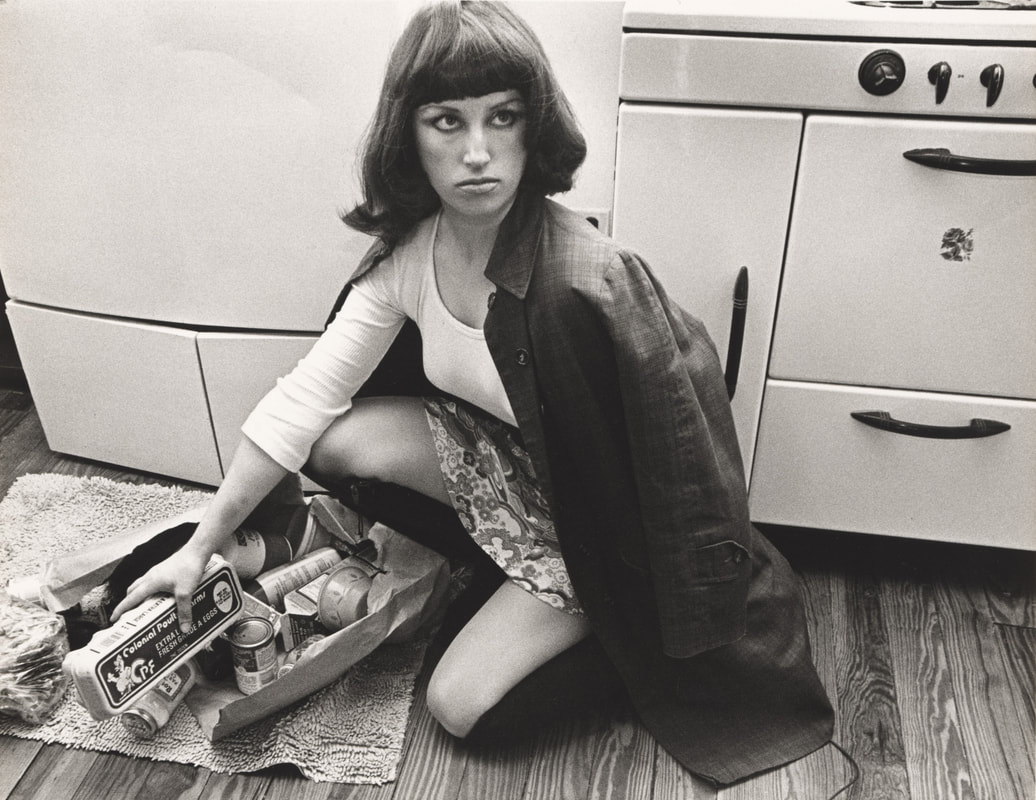
Cindy Sherman is a feminist photographer specialising in photographic self-portraits, born in 1954 New Jersey. Sherman has stated that Andy Warhol has influenced her and her artwork. In the 80s it is said that she became the most important personalities in recent art. Cindy Sherman successfully created a piece of art work between 1977 and 1980 called Untitled film Stills which consists of 69 black and white photographs of life of women during then. Cindy Sherman places herself as both the subject and the photographer. In each photograph she poses in stereotypical roles of females - influenced by 1950s and 60s Hollywood movies, illustrating the sexist clichés of women, debunking these stereotypes and cultural beliefs by photographing this. I believe that her work is powerful, extremely in that time. Her series was the first significant work that gave her international recognition, becoming her most well-known project. I am responding to her series. Below are photographs #7 #10 and #12 from the series Untitled Film Stills.
|
|

|
What I want to create:
I intend to capture the stereotypical view and expectations of females. I want to create multiple responses, which symbolises the many sexist expectations of females.
I intend to capture the stereotypical view and expectations of females. I want to create multiple responses, which symbolises the many sexist expectations of females.
First response
This relates to the photographer as it is a portrayal of the stereotypes of women that still exist in this day and age.

|

|

|
|
WWW:
The images do represent the stereotypes of women. The images are in focus and blurred where I wanted it to be. My subject never looks directly at the camera to purposefully show that she is "trapped" in the photograph the way she is "trapped" in the societal expectations. |
EBI:
I had better composition so what my subject is doing is more visible. I dressed up my subject in clothes that better show what a stereotypical female wears. |
Second response
Development: thought
I gradually turned my responses from Duane Michals to Cindy Sherman. The long shutter speed is not used in my response to Cindy Sherman but the black and white element is there.

|

|
Final Piece
My final piece will consist of a response to Duane Michals but with a change from my subject being inanimate objects and to keeping my own element of fast aperture.
Thought: I have an empty swinging swing to signify that it is empty, and the disoriented mental state of the subject looking at the swing, which the viewers of this series view the series from the viewpoint of the subject. Then, I capture on image with someone sitting in the chair, which is someone significant to the subject. The person is dead and imagined in that seat, which is seen by the viewers as the person is in the seat in one photograph but not in the other. I placed the two more images after the one image of the girl on the swing to show that the subject at last came to the realisation that she is not actually there, but gone - the last image. The setting - the flowers and grass and bushes were purposeful. I placed the swing there to show the content of the subject. Furthermore, the setting connotes a heaven-like place, which in this case is to the subject, it is also what she wishes. The long shutter speed allowed the images to be blurred. The long shutter speed on the subject created a second face which is more transparent and in the background which is looking down with a sad expression reflecting how the subject feels beneath it. This symbolises the reality of how she is no longer here. I turned my images black and white to both, present the image as this is the past - the girl's life is no longer. And, to evoke the sadness to the viewer.
In a sequence: order - left to right


|


|
